
How to Clean an AR-15 (Step-by-Step Breakdown for Beginners)
“Cleanliness is next to godliness.” And if you want your AR to run like it should, it’s time for a little divine intervention!
Let’s face it, most of us don’t clean our AR-15s as often as we should. Maybe you’ve run thousands of rounds through your rifle without so much as a wipe-down. Maybe your bolt is starting to feel a little “sticky.”
Maybe you just bought your first AR-15 and are wondering how to keep it in good condition.
Sound familiar? Don’t worry, you’re not alone.
Firearm maintenance isn’t just a task for us – it’s where CAT Outdoors got its start. We’ve built tools, tested products, and stayed rooted in the idea that a clean rifle is a dependable rifle. More on that later…

In this guide, we’ll show you how easy it is to clean and maintain your AR-15. And give you our recommendations on the products you need to do the job.
Let’s ride…
Step 1: Tools You Need to Clean an AR-15
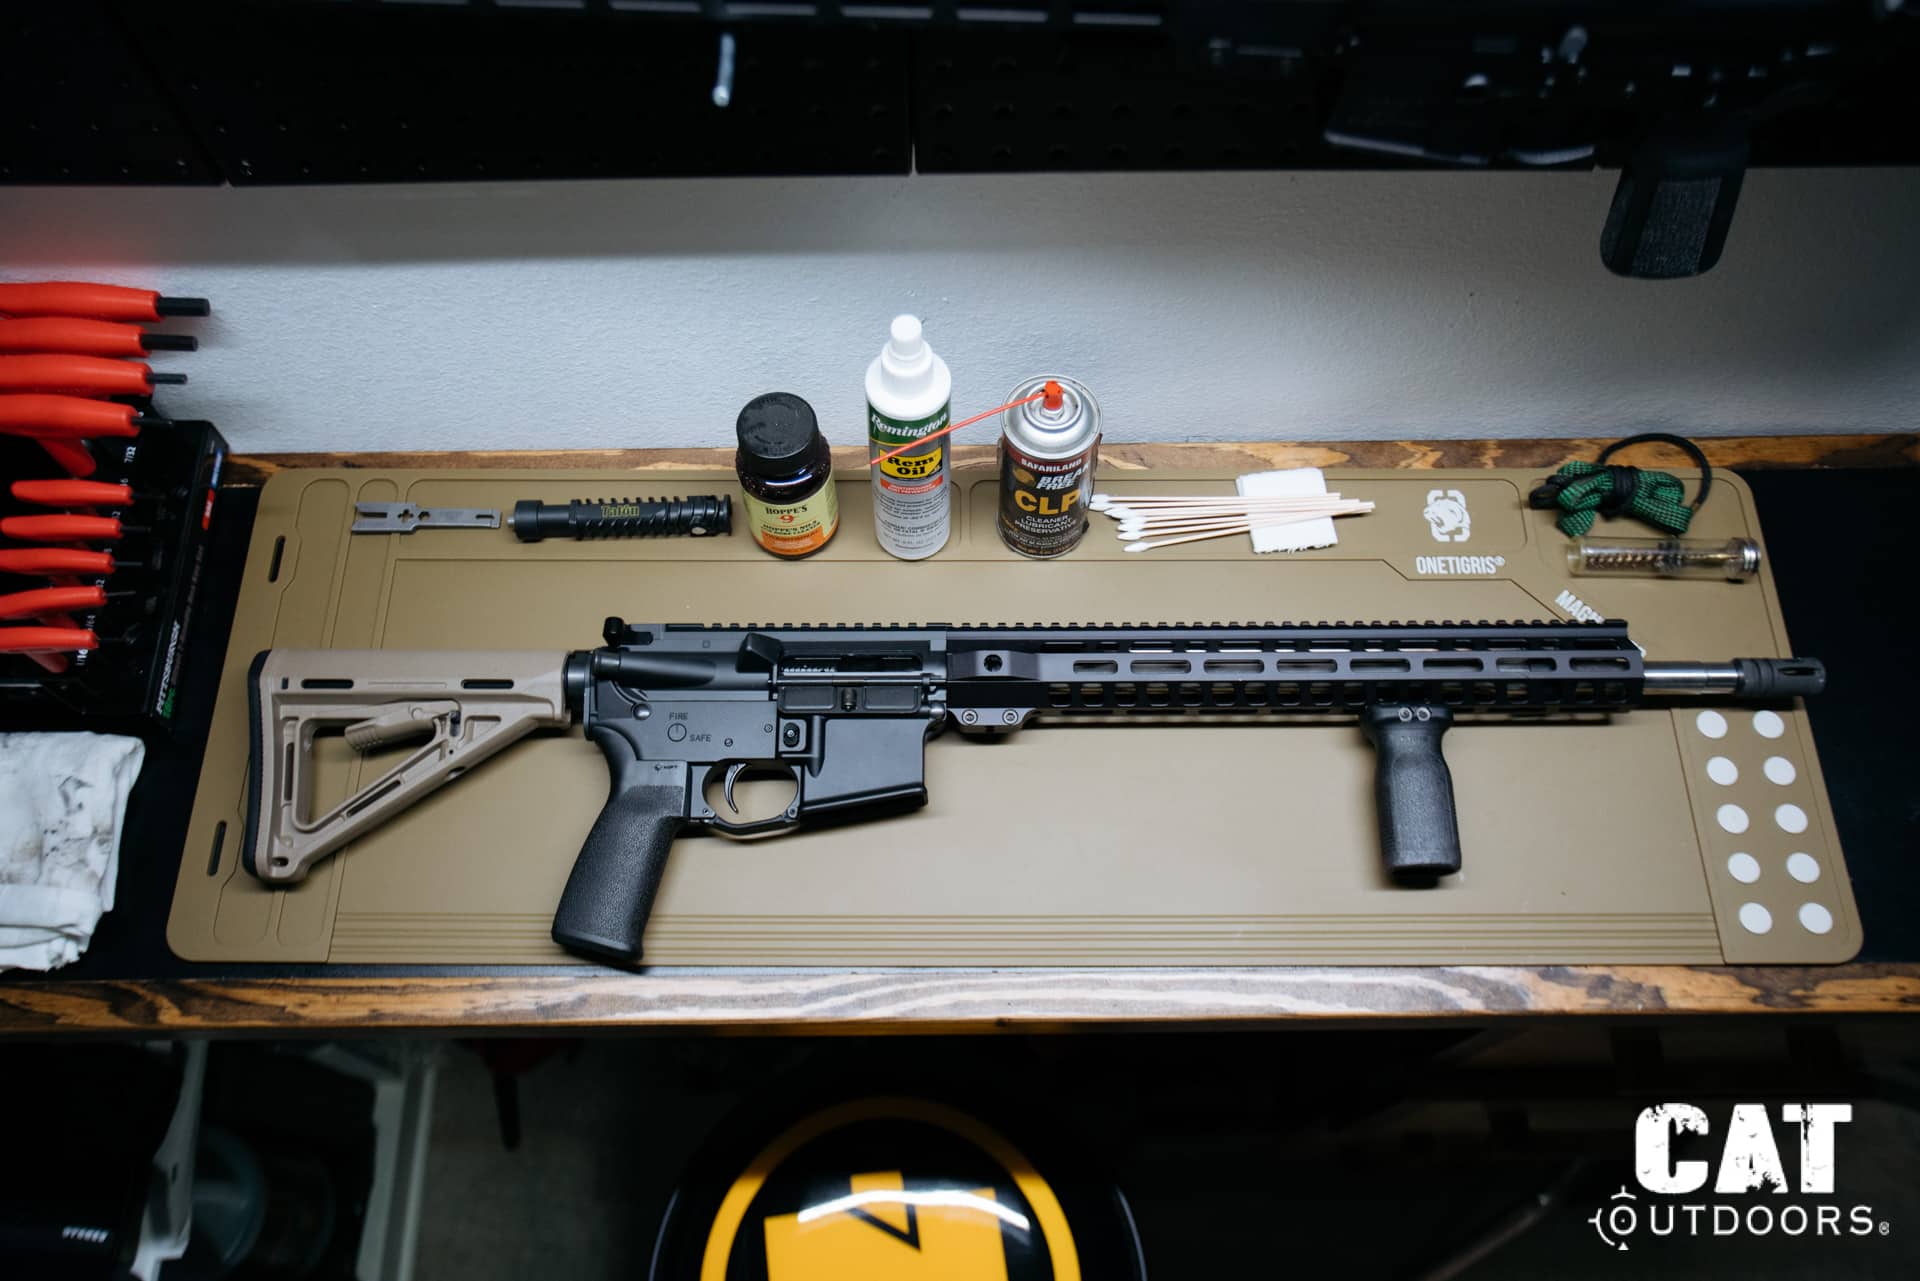
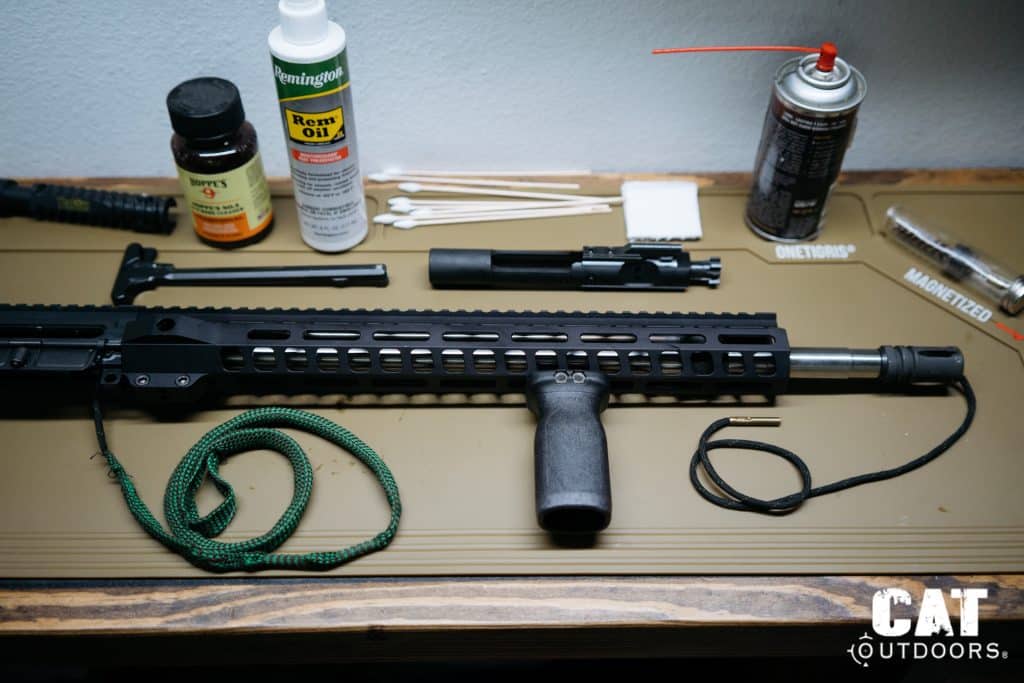
Before you start scrubbing carbon off your bolt carrier group or fishing gunk out of your upper receiver, you’re going to need the right tools. Cleaning an AR-15 isn’t complicated, but it does require a few essentials. Skip these and you’re just pushing dirt around.
Option 1: Go with a Pre-Made Gun Cleaning Kit
If you’re new to gun maintenance or just want something that covers all the basics, a pre-packaged AR-15 cleaning kit is a great place to start. Check out our guide on the Best Gun Cleaning Kits.
These kits usually include bore brushes, chamber brushes, cleaning rods, jags, patches, and a few picks or scrapers. Many of them come in compact, organized cases that make it easy to keep everything in one place.
Look for kits specifically designed for .223/5.56 rifles. Universal cleaning kits are fine in a pinch, but they often include tools you won’t use and skip some that you really need, like a star chamber brush or a flexible cable pull-through.

But here’s the truth: most cleaning kits leave one thing out: the CAT M4 Tool, and that’s a problem. This compact tool is purpose-built for cleaning carbon buildup from the bolt, bolt carrier, and firing pin.
If you’ve ever tried scraping baked-on carbon with a toothbrush or a bent paperclip, you know how frustrating it can be. The CAT M4 makes that job way easier and more efficient, and we recommend it no matter what kit you go with.

GLORYFIRE Elite Gun Cleaning Kit
For a deeper dive, check out our picks for the Best Gun Cleaning Kits.
Option 2: Build Your Own AR-15 Cleaning Kit
If you’ve been around guns for a while or you just prefer a more custom setup, building your own cleaning kit gives you total control. You get to pick the tools and accessories that work best for how often you shoot, how dirty your rifle gets, and how detailed you want to go.
You can store everything in a simple tackle box, like the Flambeau Outdoors 2-Tray Tackle Box, or keep it all organized in a dedicated range bag.
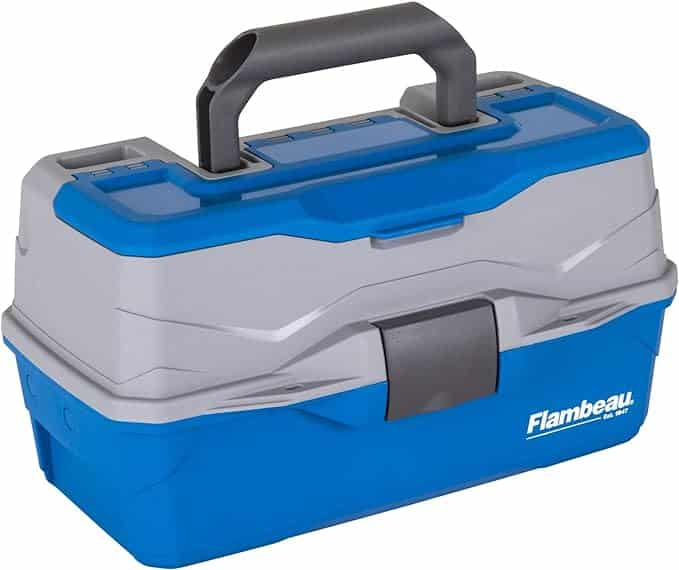
Flambeau Outdoors 2-Tray Tackle Box
Here’s what you’ll want in a DIY cleaning kit:
- .223/5.56 bore brush and chamber brush
- Bore snake or one-piece cleaning rod
- Jags and patches
- Nylon and brass brushes
- Dental picks or carbon scrapers
- Microfiber cloths and Q-tips
- Your preferred CLP (cleaner, lubricant, protectant)
- CAT M4 Tool – It fits perfectly into the tight spaces of your BCG and scrapes away carbon in seconds, no disassembly wizardry required.
You’ll want to lay down a mat or towel to protect both your work surface and your rifle. Dedicated gun cleaning mats are great because they’re chemical-resistant, padded, and often have diagrams to remind you where everything goes.
We like the OneTigris Mat w/ Magnetic Dots. This gives you a quality mat at a decent price.


OneTigris Mat w/ Magnetic Dots
But honestly, an old bath towel will work in a pinch, as long as you’re okay with it adopting a more dangerous line of work as a permanent part of your cleaning kit.
You may also want to pick up a quality pin punch set or an AR-15 vise block. It sits in the magwell and lets you secure the rifle in a bench vise without marring the finish, making cleaning and maintenance a whole lot easier and safer.
Putting together your own kit also lets you upgrade as you go. Maybe you add a bore guide or a chamber flag later on. Maybe you start storing everything in a compact range bag or a hard case. The point is: you build what works for you.
Best AR-15 Cleaning Solvents and Lubricant
There’s plenty of options to go with here, but here are a few of our favorites.
- Hoppe’s No. 9 Gun Bore Cleaner & No. 9 Lubricating Oil
- Break Free CLP
- Clenzoil Field & Range CLP Gun Lubricant
- Ballistol – if you’ve ever watched Hickok45 on YouTube, this is what he recommends
Step 2: Prep the Area and Clear the Firearm
Before you crack open your AR and start going to town with solvent and patches, take a moment and prep your space. This step might not feel as “tactical” as scraping carbon out of your bolt carrier group, but it’s where good habits start.

Setting Up Your Workspace
Set up somewhere with plenty of light, good ventilation, and a solid, flat surface. If you can smell the solvents you’re working with, you’re breathing them in – so crack a window or run a fan if you’re indoors. Avoid carpeted areas unless you like your house smelling like a refinery.
Clear the area of ammo. You don’t want any live rounds anywhere near your cleaning bench. This isn’t the time for accidents. Keep your workspace focused, uncluttered, and free of distractions so you can move through the process safely and efficiently.
Safety First: Clear the Firearm
This is non-negotiable. Every single time you clean your AR-15, clear it first. Doesn’t matter if you just came back from the range or know it’s unloaded – check anyway.
Always follow the 4 Rules of Gun Safety.

Here’s the process:
- Point the rifle in a safe direction.
- Drop the magazine. Don’t just look. Physically remove it.
- Pull the charging handle back and lock the bolt to the rear.
- Visually and physically inspect the chamber. Shine a light in there if needed.
- Check the magwell. Again, no shortcuts.
Once you’ve confirmed it’s clear, let the bolt go forward and put the rifle on safe (if it allows). You’re now ready to disassemble without any risk of turning your cleaning session into an unscheduled trip in a meat wagon.
Bonus Tip: Keep Your Small Parts in Check
As you disassemble your rifle in the next step, use small trays or magnetic parts holders to keep pins, springs, and screws from rolling off the table and vanishing into another dimension. You’ll thank yourself later when you’re not crawling around on your hands and knees looking for a takedown pin detent.

More from CAT Outdoors:
Daily Deals
Best 9mm Carbines
Best .22LR Pistols
Best 1911 Guns
Best AR-15s
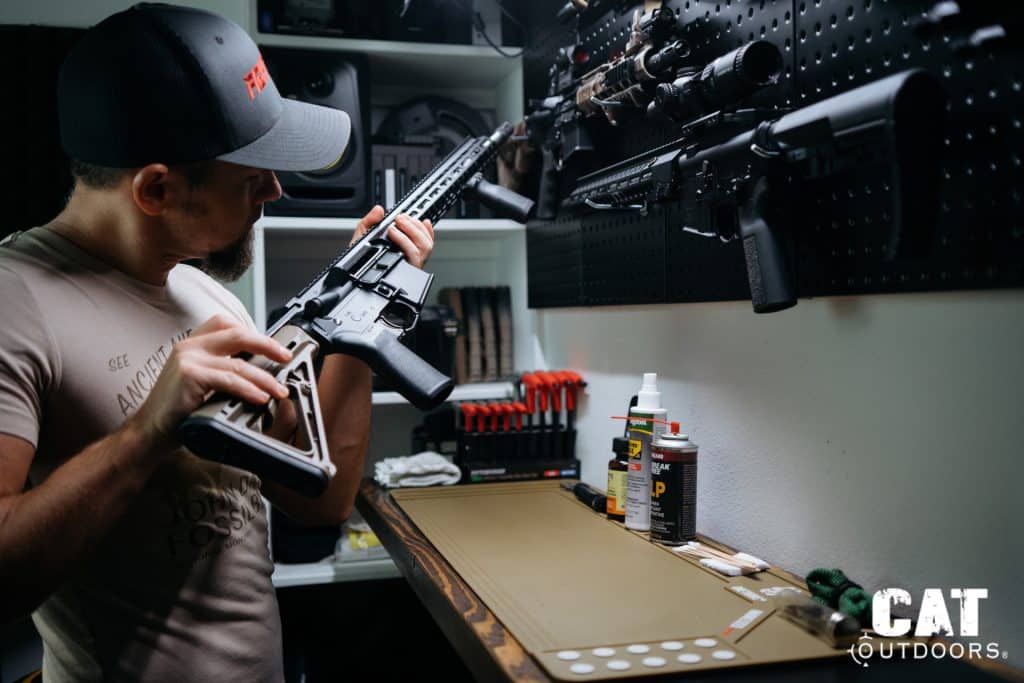
Step 3: Field Strip Your AR-15
Now that your workspace is set and your rifle is confirmed clear, it’s time to field strip your AR-15. This isn’t a full detail strip where you punch out roll pins and mess with the trigger group. Just a standard breakdown to access the key components that need regular cleaning.
If you’ve never done this before, don’t worry. The AR platform was designed to be field stripped in seconds by a 19-year-old with gloves on and a drill sergeant yelling in his face. You’ve got this.
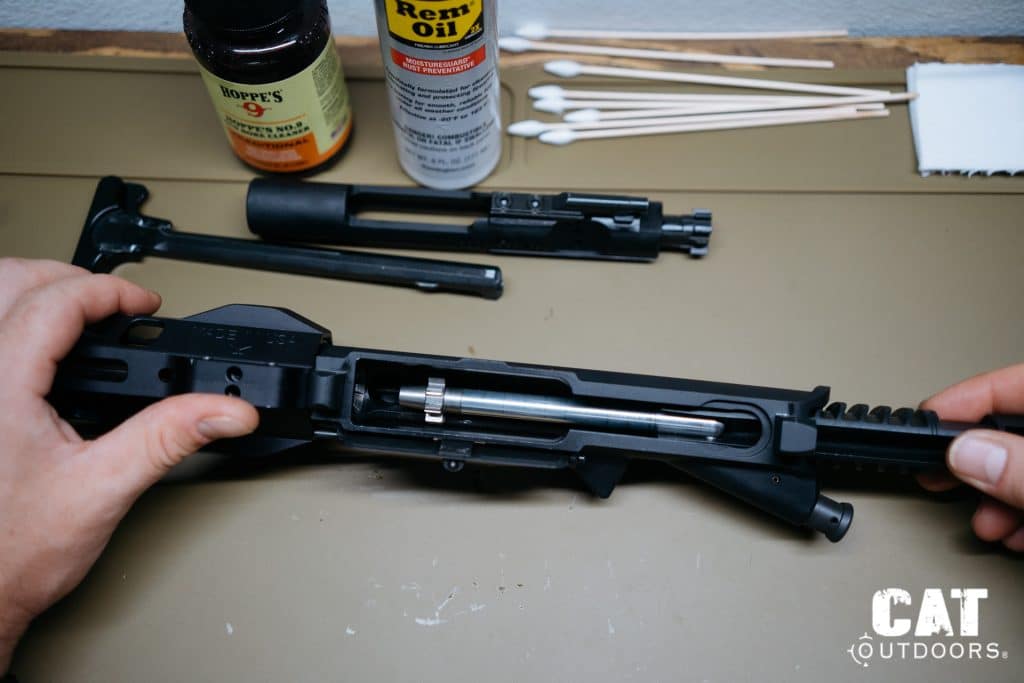
Separate the Upper and Lower Receivers
Start by pushing out the rear takedown pin. You don’t need a tool for this, just use your thumb to push it through. The pin is “captured,” meaning it won’t fall out completely.

Once the pin is out, pivot the upper receiver open like a clamshell.
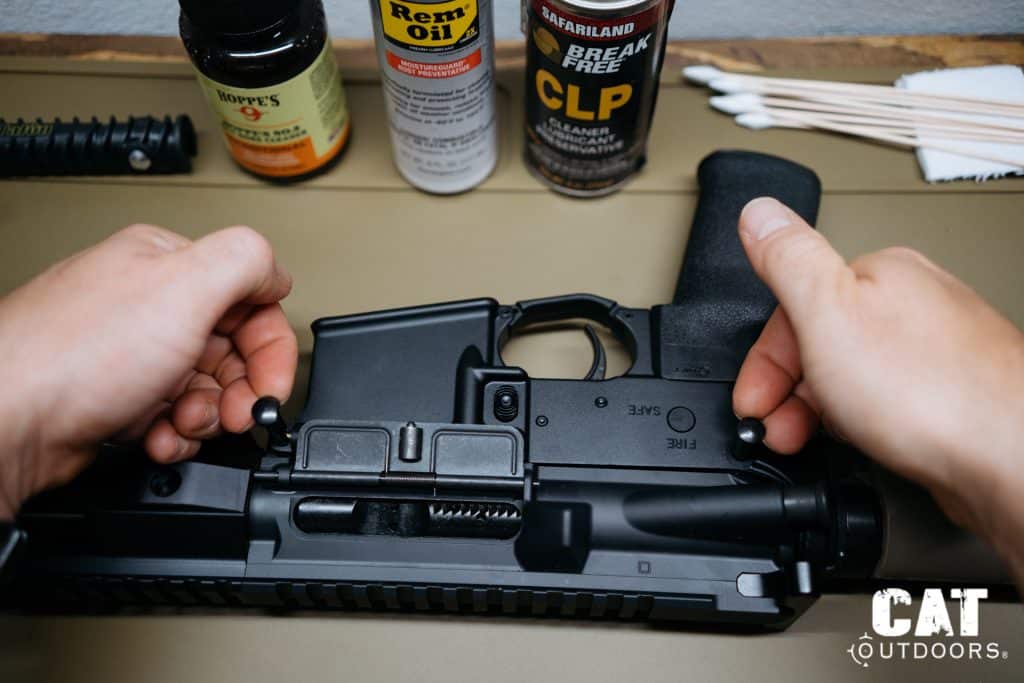
Now, push out the front pivot pin and your upper and lower receivers will fully separate.
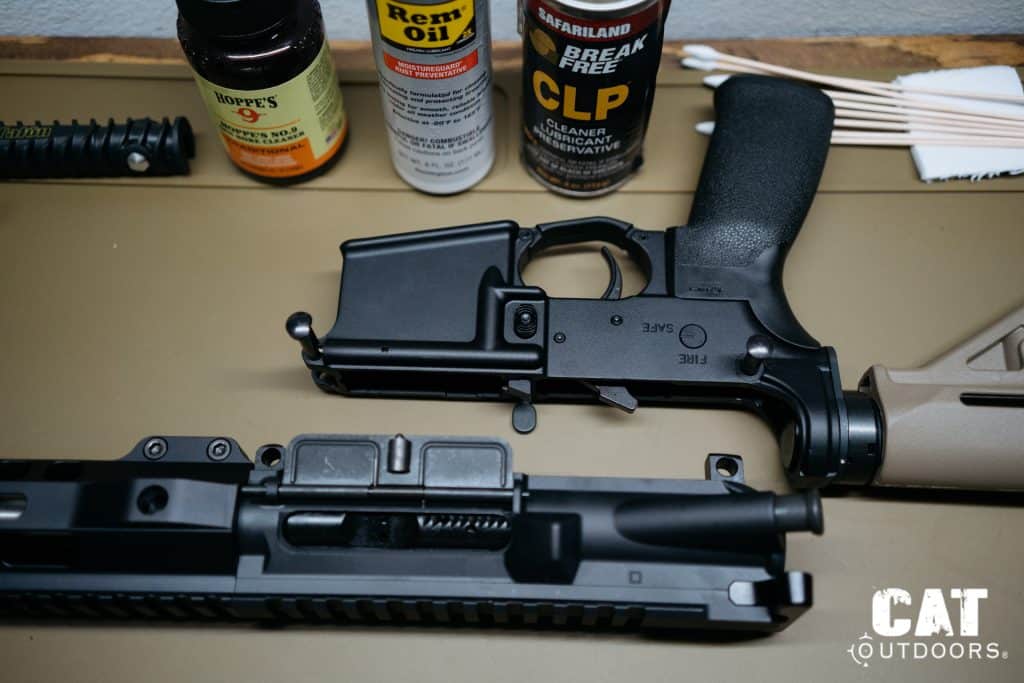
Set your lower receiver aside. Unless it’s absolutely filthy or has been exposed to water, dirt, or grit, you won’t need to deep-clean it every time.
Remove the Charging Handle and Bolt Carrier Group (BCG)
Pull back on the charging handle to slide out the bolt carrier group (BCG). Once the BCG clears the upper receiver, pull the charging handle slightly downward and back to remove it.
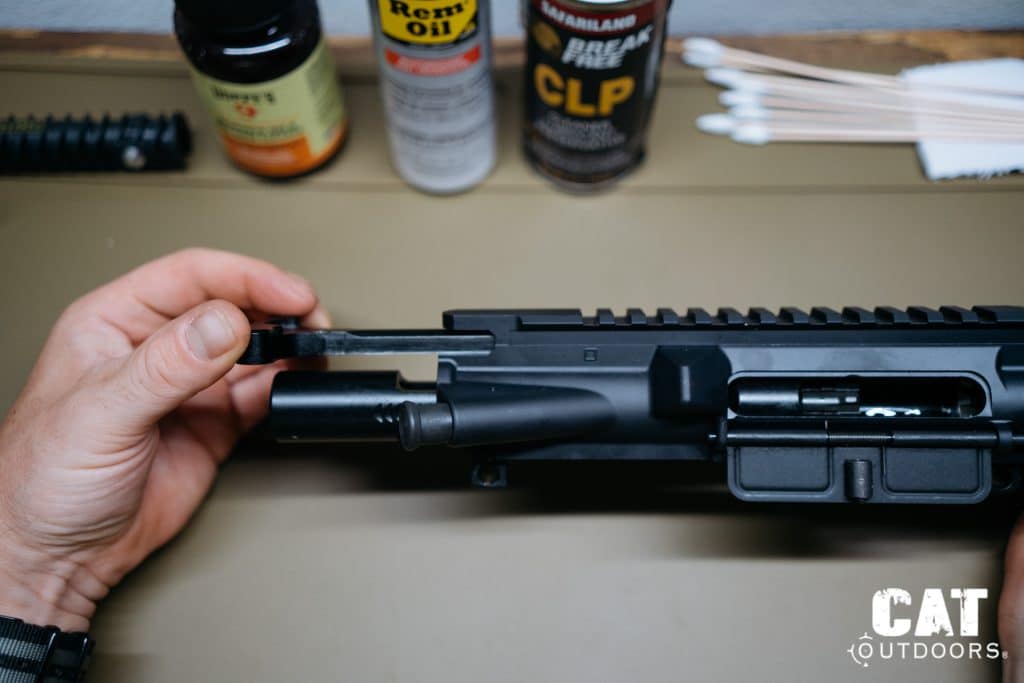
Now you’ve got the BCG and charging handle out – two of the most carbon-packed parts of the entire rifle.

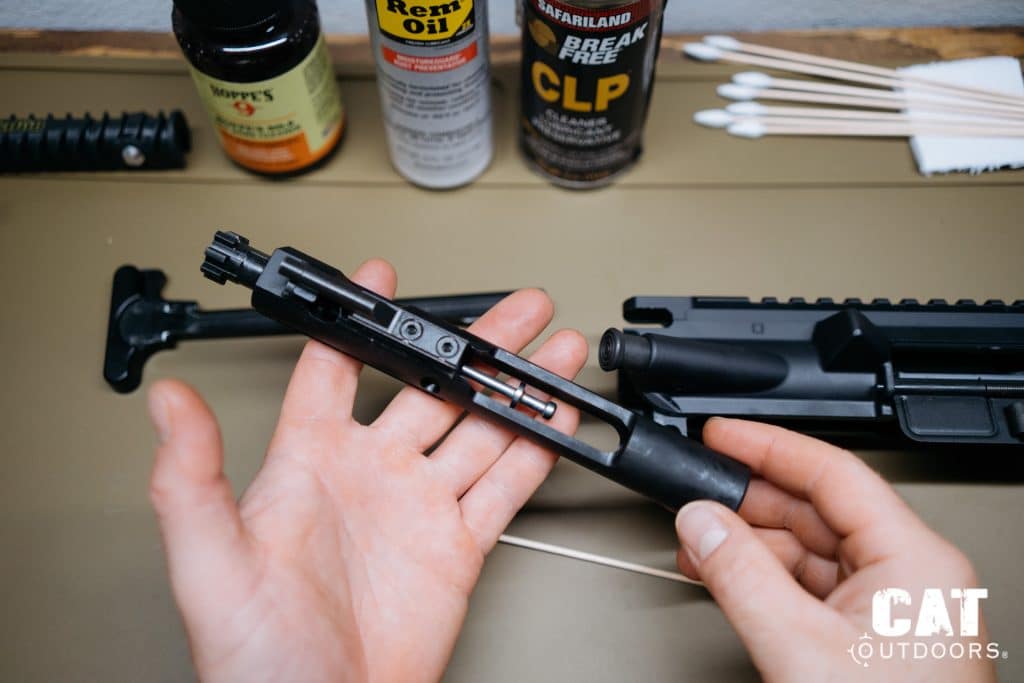
Break Down the Bolt Carrier Group (BCG)
This is where things get a little more detailed, but it’s nothing you can’t handle.

- Use a punch or the tip of a round to remove the firing pin and retaining pin (located on the side of the bolt carrier).

- Tilt the carrier back and the firing pin will slide right out.
- Rotate the cam pin 90 degrees and pull it out.
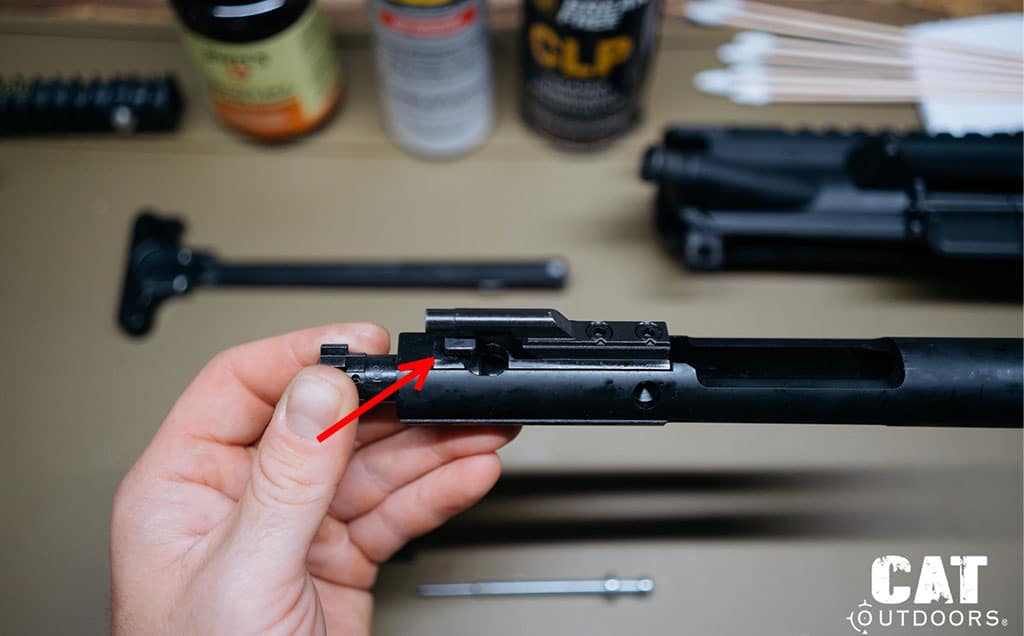

- Now, pull the bolt forward and out of the carrier.
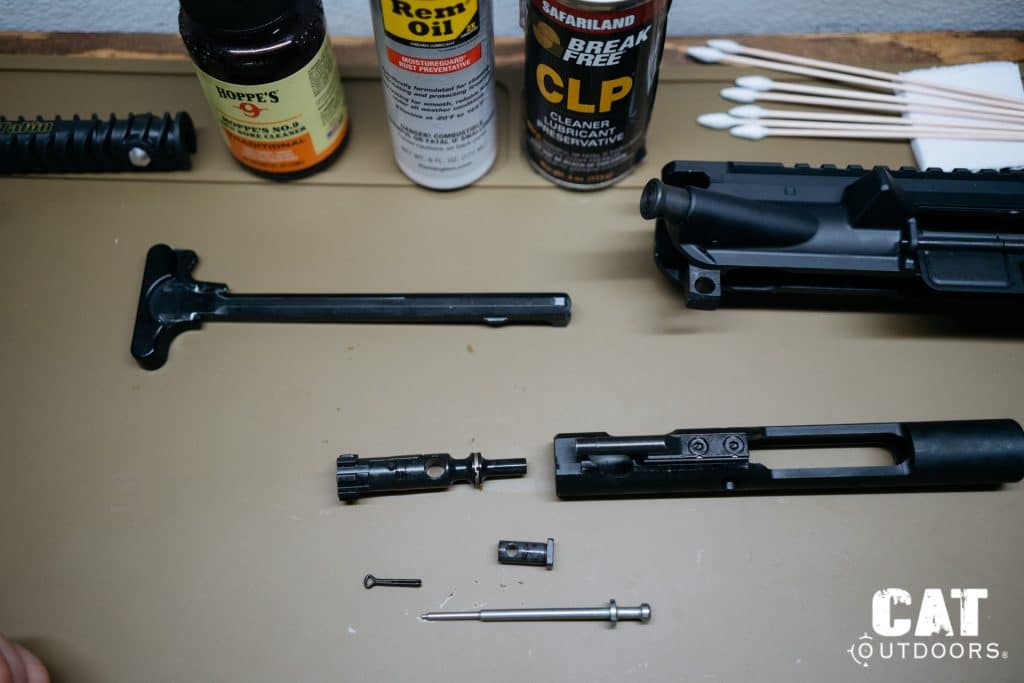
At this point, your BCG is disassembled into all its core parts. It might look like a small pile of components, but each one plays a big role in keeping your rifle running, and we’re going to get them spotless in the next step.
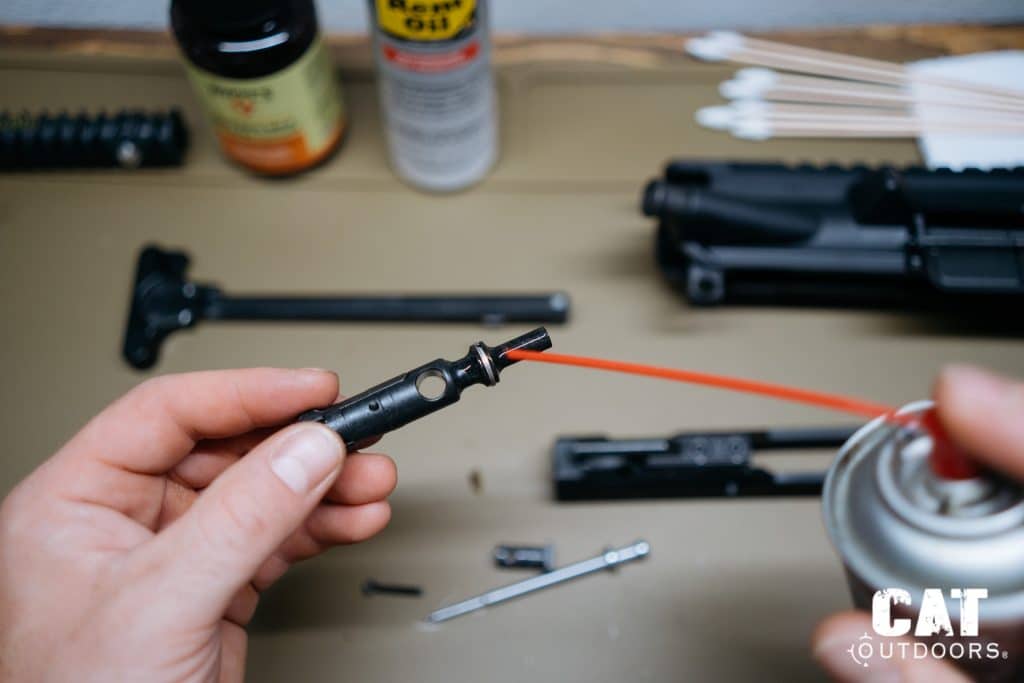
Remove the Buffer and Spring (Optional, but Recommended)
Flip your attention back to the lower receiver.
Use your CAT M4 Tool to press down on the buffer retainer (the little plunger holding the buffer in place) and gently slide out the buffer and recoil spring.
These components don’t need constant cleaning, but giving them a wipe-down every few sessions helps prevent gunk buildup and keeps cycling smooth.
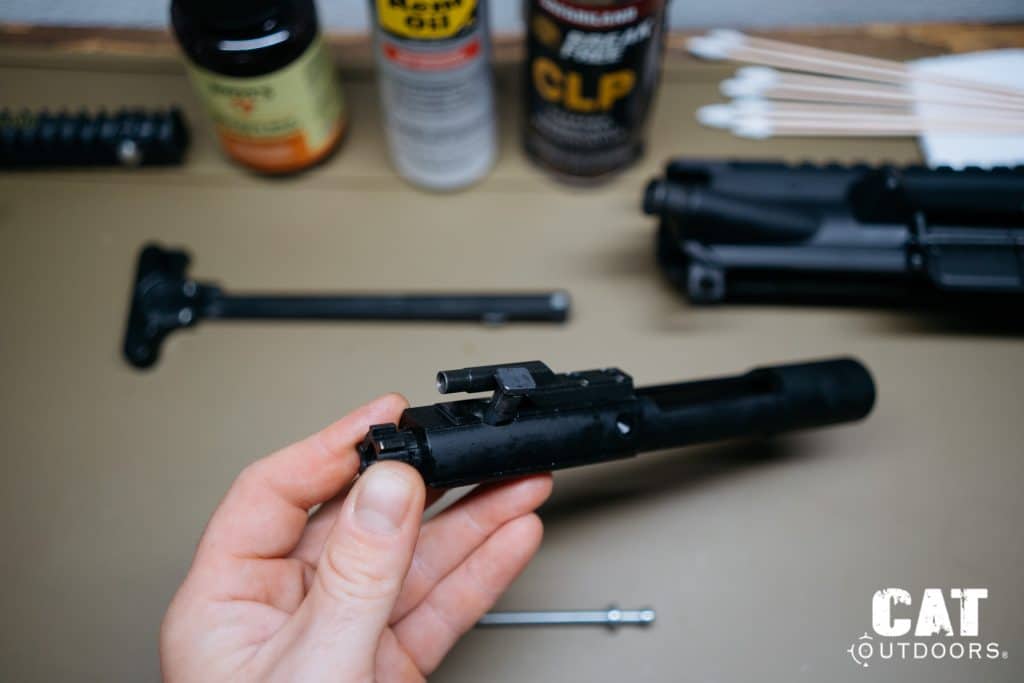
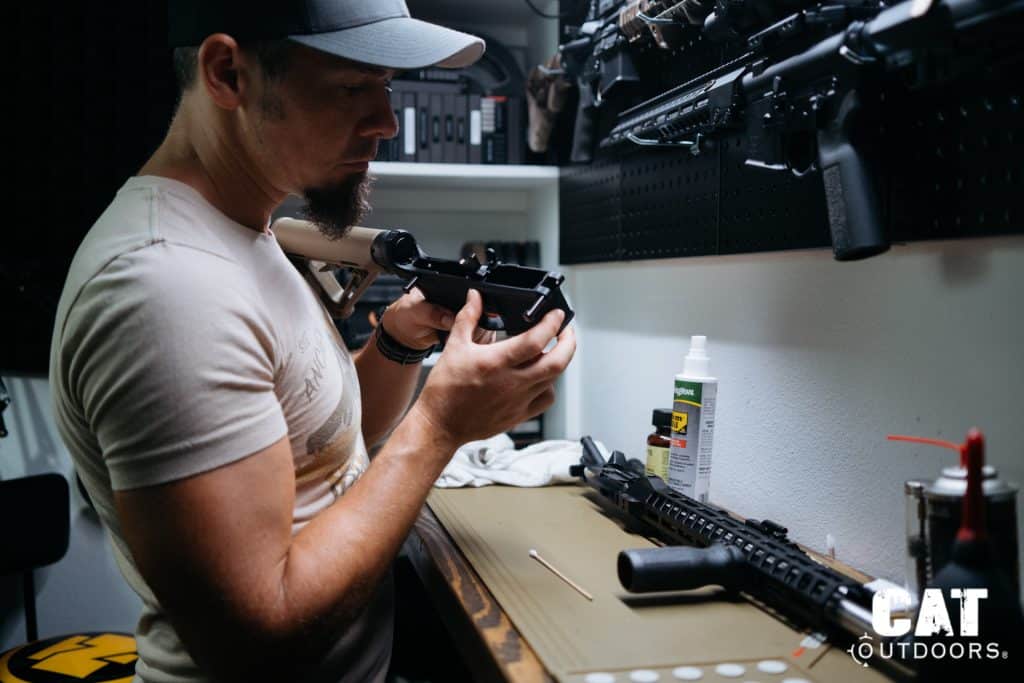
Step 4: Clean the Bolt Carrier Group (BCG)
The bolt carrier group is the beating heart of an AR-15. If you just want a quick clean instead of a deep dive, this is the area you should focus on.
This assembly handles the action every time you pull the trigger, feeding rounds, firing them, extracting casings, and cycling the next shot. That kind of work builds up a serious carbon crust, and if you don’t stay on top of it, your rifle’s reliability will start to suffer.

This is the dirtiest part of the gun, but also the most satisfying to clean. Think of it this way, cleaning your BCG is like giving your car a tune-up – sure, it’s not glamorous, but it’s the work that keeps everything running smooth. Let’s break it down.
Wipe Down the Firing Pin
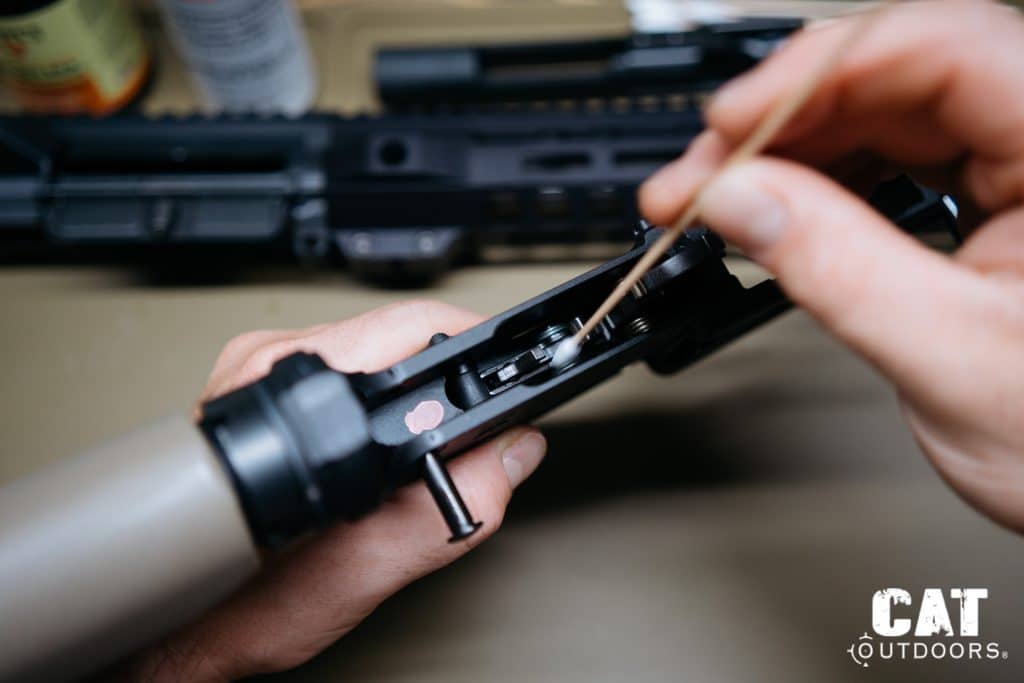
Start simple. Grab a rag and solvent, and wipe down the firing pin. Use the CAT M4 Tool to clean the firing pin flange.
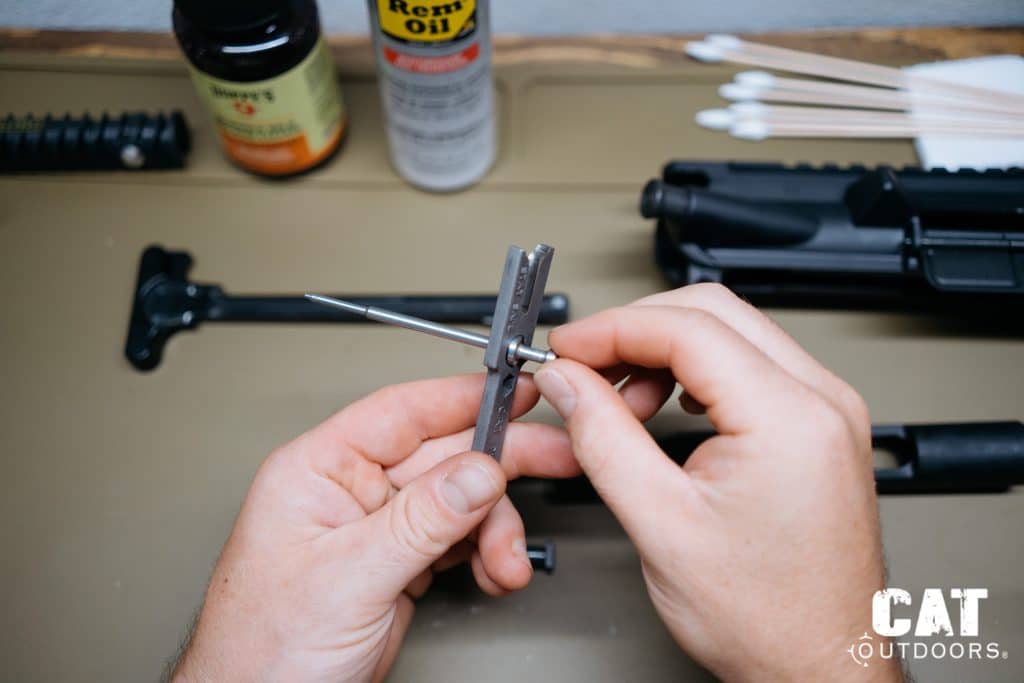
You’ll notice some carbon near the tip. You can also scrape that off gently with a nylon brush or a brass scraper if needed. No need to go full wire-wheel on it; just get the gunk off.
Clean the Bolt
This is where the CAT M4 Tool shines. Use it to scrape the carbon off the bolt tail, the cylindrical part that looks like it came out of a coal mine. The CAT Tool is designed to fit perfectly around that diameter and make short work of the baked-on grime.

Once scraped, use a nylon brush, a cotton swab, and a little solvent to clean:
- The bolt face
- The gas rings
- The extractor claw
If you want to go the extra mile, remove the extractor by punching out the retaining pin. This gives you access to clean under the extractor where brass shavings and carbon love to hide. Just be careful not to launch the tiny spring and insert when reassembling.
Clean the Bolt Carrier
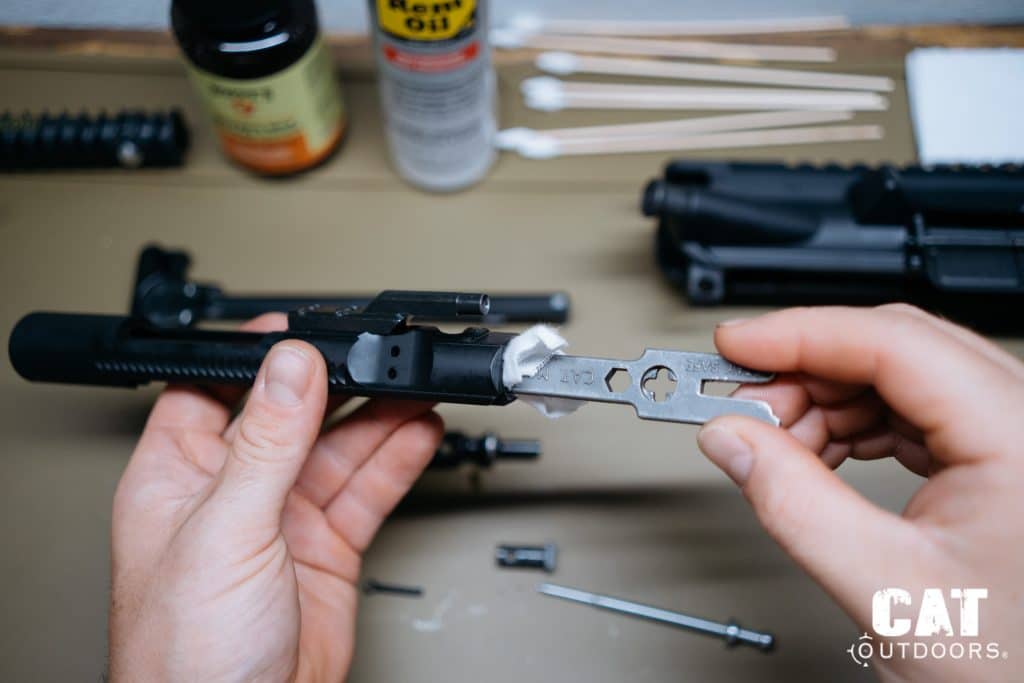
Next, grab the bolt carrier body and hit it with some solvent and your brush. Focus on the interior bore where the bolt rides (a chamber brush works great here), and don’t forget the gas key. Carbon builds up inside and at the mouth.
The CAT M4 Tool can also clean inside the carrier itself. Twist a cleaning patch through the patch hole.

Now, insert it into your carrier, twist, and it’ll strip away fouling from the interior walls. This tool alone cuts cleaning time in half, especially if you shoot suppressed.
Wipe Down and Inspect the Cam Pin & Retaining Pin
These don’t get as nasty, but give them a wipe and inspect for any unusual wear or cracks, especially the cam pin. If it looks chewed up or warped, it’s time for a replacement.
Lube as You Go
Before you reassemble, apply a light coat of lubricant to all friction points. That means:
- The bolt lugs
- The cam pin
- The rails on the carrier
- A drop inside the gas key
Your BCG should be slick, not dripping. Wet enough to move freely, dry enough not to gum up in cold weather or dusty conditions.
Step 5: Clean the Upper Receiver and Barrel
The upper receiver is home to the chamber, the barrel, and your gas system – all of which catch their fair share of fouling every time you send a round downrange. Cleaning this section isn’t just about keeping things shiny, it directly impacts your accuracy, cycling, and long-term durability. So let’s get after it.
Start with the Chamber
Before you even touch the barrel, clean the chamber. That’s where spent casings expand, and if there’s too much fouling or carbon build-up, you’ll start getting failure to extract or stuck casings.
The easiest way to knock that junk loose is with the CAT Outdoors Talon Tool.
Its design lets you get into the tight corners of the chamber and locking lugs far better than a standard brush.
Run it in with a little solvent and really work the edges – it’s built for the aggressive scrubbing this area needs.
Use a chamber brush attached to a cleaning rod or handle. Dip it in solvent, insert it into the chamber, and scrub thoroughly. Don’t just twist it – get aggressive. The star-shaped brush is designed to hit all the nooks.
Follow up with some dry chamber swabs or patches to soak up the residue. You want it clean and dry before moving on.
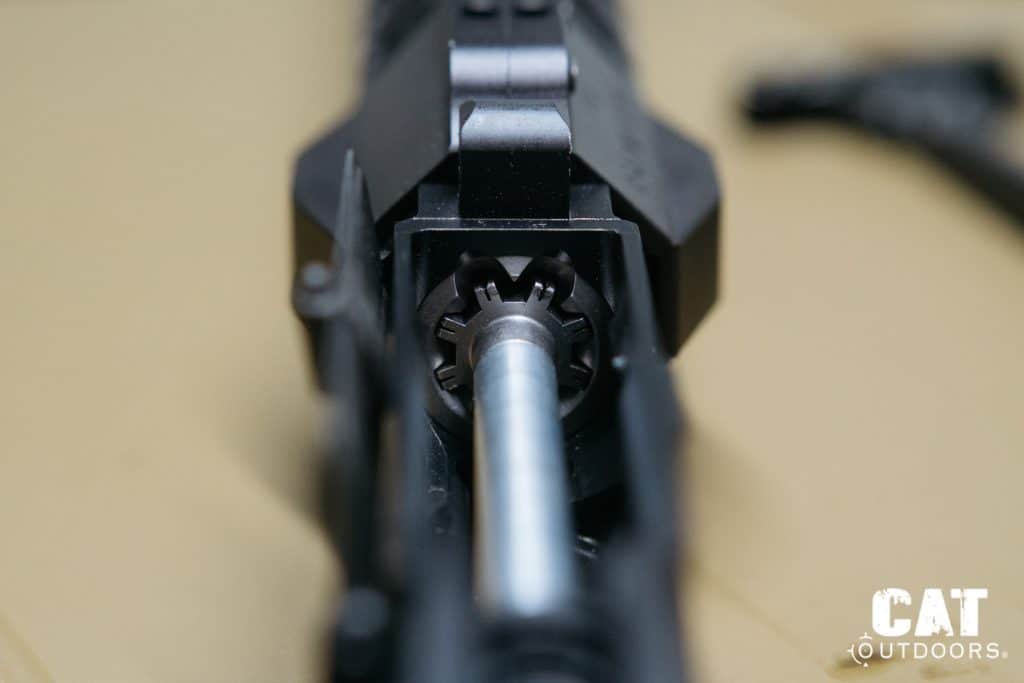
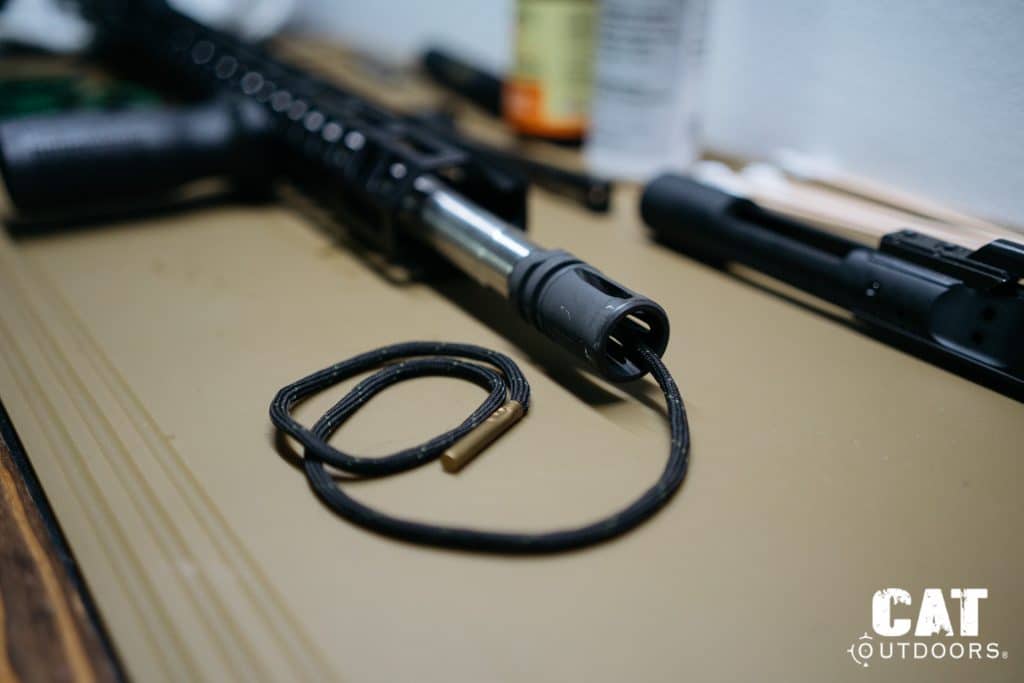
Clean the Barrel from Chamber to Muzzle
You have two options here: a cleaning rod or a bore snake. A cleaning rod will offer a deeper clean if you want it, but for most purposes a bore snake will get the job done.
Always clean your barrel from chamber to muzzle to avoid dragging debris back into the chamber.
Apply a small amount of CLP to the braided nylon, drop the weighted metal end through the chamber and let it slip out the muzzle. You should have enough length to get a good grip to pull on.
Give it a good pull so the brush scrapes away carbon and the nylon handles the rest. The CLP on the nylon will rub off on the barrel as it’s pulled through.
If you’re running a suppressor or shoot a lot of steel-cased ammo, consider using a copper solvent to clear out built-up jacket material.
Do this and you’ll have a clean barrel ready to go.
Wipe Down the Upper Receiver
Use a nylon brush and solvent to scrub out the inside of the upper, paying special attention to the charging handle channel, rails, and inside of the dust cover. This isn’t a white-glove area, but it shouldn’t be black with sludge either.
Wipe down with rags or patches, and use cotton swabs or dental picks to hit tight corners.
Clean the Charging Handle
Give the charging handle some love. It’s often overlooked, but this part gets surprisingly grimy. Scrub it clean, especially the underside where it interfaces with the BCG. Then apply a small amount of lube where it rides inside the upper.
Inspect the Gas Tube and Gas Key
You don’t need to clean the gas tube unless you’re doing serious high-round-count maintenance. It self-cleans to a degree. But inspect it. Look for signs of blockage, damage, or anything that seems off.
Same goes for the gas key on your BCG. Make sure it’s not loose, the screws are staked, and it’s free of debris.
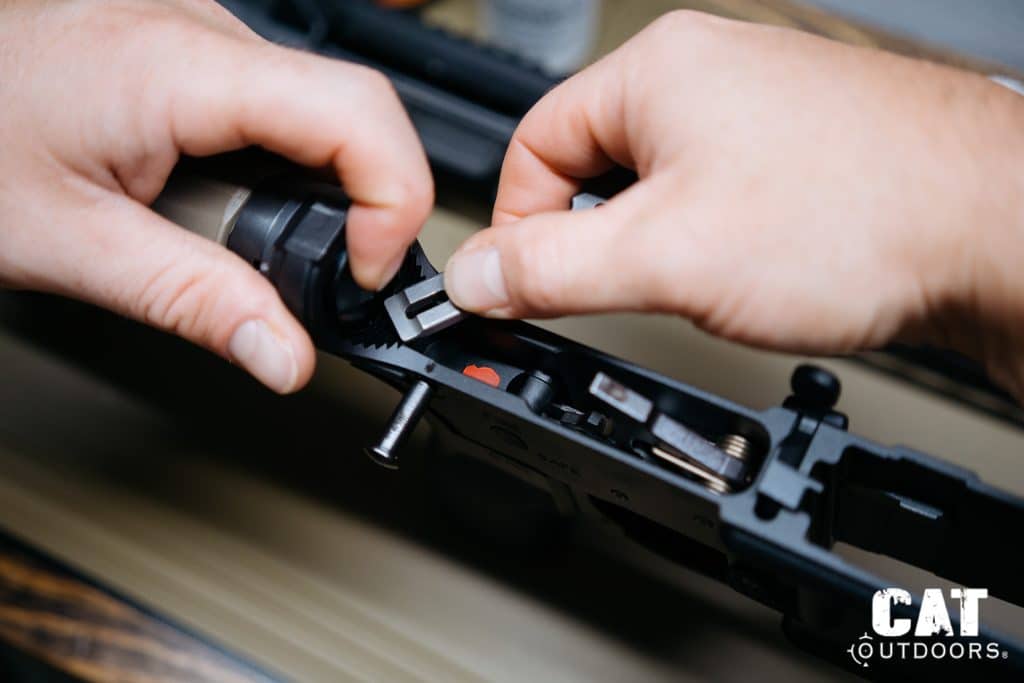
Step 6: Clean the Lower Receiver and Reassemble Your Rifle
Now that your upper’s clean and your bolt carrier group is good to go, it’s time to move on to the lower receiver, home to your trigger, buffer system, and all the little parts that keep the rifle running smoothly. This isn’t the dirtiest part of your AR-15, but neglect it long enough and you’ll start feeling it in sluggish triggers, gunked-up detents, and unreliable cycling.
Wipe Down the Trigger Assembly
Start by removing any loose carbon and debris using a nylon brush and compressed air or a rag. Be careful not to oversaturate the trigger group with solvent. Too much can gunk things up, especially if it seeps into the pins or springs.
Instead, use a brush with a little solvent and gently work it into the nooks and crannies around the hammer, trigger, and disconnector. Follow up with a clean, dry cloth or swabs to soak up the residue. You’re not doing surgery here – just enough to knock out the grit and keep things moving.

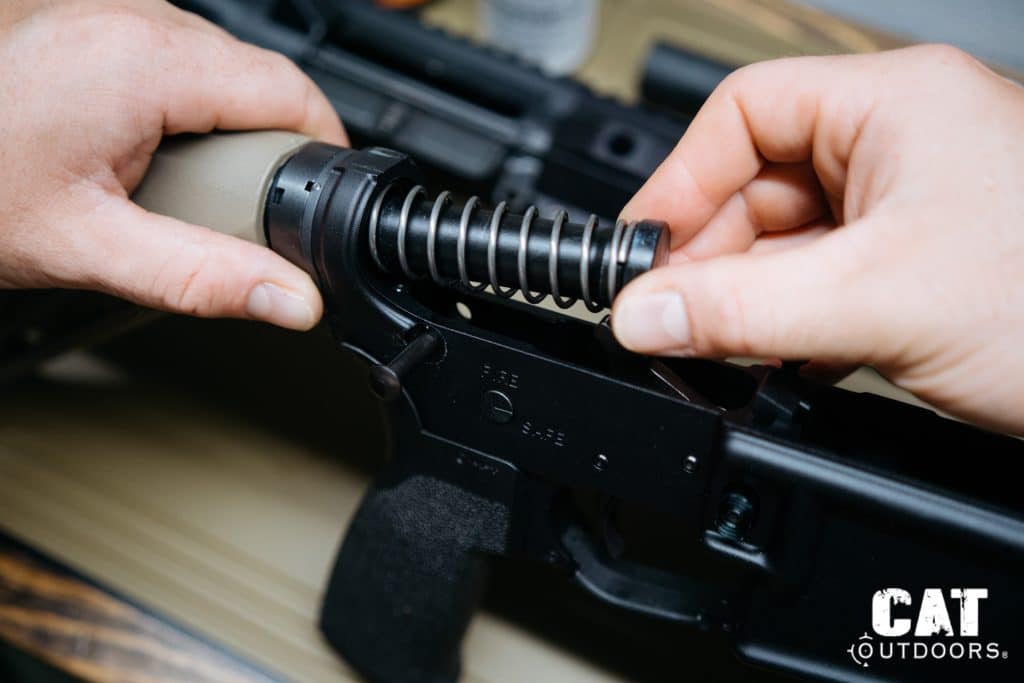
Clean the Buffer Tube and Spring
Pop the buffer and spring out of the receiver extension (buffer tube). Wipe them down with a rag and a bit of solvent if needed. They don’t get filthy unless you’re running suppressed or shoot high volume, but it doesn’t hurt to give them a good once-over.
Look inside the buffer tube with a flashlight and wipe out any grime or debris. Don’t go overboard here, no need to grease it like a truck axle. Just a light coat of lubricant on the buffer spring is enough to reduce noise and keep cycling smooth.
Inspect the Magwell, Safety Selector, and Takedown Pins
Use a dry cloth or cotton swab to clean the inside of the magwell, especially near the bolt catch, which can collect grime. Cycle the safety selector a few times and make sure it’s smooth. If it’s gritty, hit it with a little CLP and work it in.
Wipe down the takedown and pivot pins, removing any carbon build-up around the detents or springs. If they feel sticky, a light dab of lube will help keep things snappy.
Reassemble the Rifle
Once everything is clean and dry, reassemble your rifle:
- Insert the buffer and spring back into the buffer tube.
- Reattach the upper receiver to the lower—line up the pivot pin, close the receivers, and push the rear takedown pin back in.
- Insert your charging handle and BCG into the upper.
- Give the action a few dry cycles to make sure everything feels right.

Now’s a good time to check for any leftover parts (we’ve all been there), unusual resistance, or missing pins. If something feels off, stop and double-check.

Step 7: Function Check and Final Wipe Down
Cleaning your AR-15 is only half the job. Making sure it actually works after cleaning is the other half. A proper function check ensures you didn’t reassemble anything incorrectly, that all parts are working as they should, and that your rifle is ready for action.
Perform a Safety Check (Again)
Before anything else, make sure your rifle is still unloaded. Visually and physically inspect the chamber, magazine well, and bolt face. No ammo should be anywhere near the gun at this point.

Run a Basic Function Test
With the rifle fully assembled and the safety engaged, perform these checks:
- Check the Safety Selector: Put the rifle on “Safe” and attempt to pull the trigger. The hammer should not fall.
- Switch to “Fire” and pull the trigger. This time, the hammer should fall with a satisfying click.
- Hold the trigger to the rear, then cycle the charging handle. Slowly release the trigger. You should hear and feel the disconnector release and reset the trigger.
- Pull the trigger again to ensure proper reset and follow-up function.
If any of this feels mushy, gritty, or out of spec, take the rifle back down and inspect the lower parts group.
Check Charging Handle and BCG
Rack the charging handle several times to ensure the BCG is cycling smoothly. There should be no grinding, excessive resistance, or hanging up. A properly cleaned and lubricated BCG should glide through the receiver without effort.
Final Wipe Down
Using a clean microfiber cloth, give the exterior of your rifle a final wipe down. Remove fingerprints, smudges, or excess oil that might attract dust or corrosion, especially if you’re storing the rifle for a while.

Lightly oil any exposed metal surfaces that might be prone to rust, like the outside of the barrel or front sight post. Don’t drown it – just a light, even coat will do.
Store It Right
If your AR is going into storage, store it in a cool, dry place, preferably in a safe with a dehumidifier. If it’s going back into service or training, you’re ready to roll.
Check out our recommendations on the Best Gun Safes to help you keep your gun stored safely.
And that’s it. Congrats, you’ve cleaned your AR!
Bonus Tips for Long-Term AR-15 Maintenance
You’ve cleaned your AR-15, function-checked it, and wiped it down. Job’s done, right? Sort of. A clean gun today doesn’t mean a reliable gun tomorrow if you neglect regular upkeep. Here are a few extra tips to keep your rifle in top shape over the long haul.
Keep a Cleaning Schedule (Based on Use, Not Time)
Don’t fall into the trap of only cleaning your rifle once a year because it “looks fine.” Your AR-15’s maintenance needs depend on how often and how hard you run it.
- Range plinker? Clean it every 300–500 rounds.
- Training rifle or defensive setup? Clean and lube after every session.
- Safe queen? Wipe it down occasionally, but don’t overdo it.
Watch for Wear
Your rifle will talk to you, if you know where to look. Check common wear points regularly:
- Gas rings: If the BCG falls out of the upper when held vertically with the bolt extended, you probably need new rings.
- Extractor spring: Replace if extraction becomes inconsistent or sluggish.
- Buffer spring: If it starts to sound like a mattress spring or loses tension, it’s time to swap it.
Use the Right Lube—and the Right Amount
Running dry is asking for failure, but over-lubing is just as bad. A lightly oiled rifle will run smooth and clean up easier. Use high-quality gun oil or grease (depending on your climate) and apply it where it matters: bolt, cam pin, charging handle rails, and buffer assembly.
Avoid slathering oil on everything, especially in dusty or sandy environments where that oil becomes a magnet for grit.
Protect from Corrosion
Even if you don’t live in a humid climate, rust is always a threat. Store your rifle in a dry, climate-controlled place. Use a dehumidifier if it’s going into a safe. Wipe down all exposed metal surfaces before long-term storage.
If you’re storing it for months at a time, consider a light coat of rust-preventive oil and chamber flag to remind you it’s out of commission.
Log It
Keep a simple logbook or digital note of your rifle’s round count, maintenance history, and any part replacements. It’s not glamorous, but it’ll save you headaches down the line. Things like gas keys, firing pins, and springs can fail after enough cycles, and you’ll know when to replace them if you track usage.
How To Clean An AR-15 FAQs
How often should I clean my AR-15?
It depends on how much you shoot. For casual range use, every 300–500 rounds is a good rule of thumb. If you use it for training, home defense, or duty, clean it after every session. Even if it’s been sitting in storage, wipe it down every few months to prevent corrosion.
Do I need to disassemble the entire rifle every time I clean it?
No. A basic field strip, i.e. removing the bolt carrier group and charging handle, is usually enough. Deep cleans that involve removing the handguard, gas block, or buffer tube are only needed occasionally, or when troubleshooting a problem.
What’s the best lubricant for an AR-15?
Use a high-quality gun oil or grease. CLP (cleaner, lubricant, preservative) products are popular, but dedicated lubes like Slip 2000, Break-Free, or EWL often perform better. Grease works well in hot or high-friction areas, especially in hotter climates.
Can I use WD-40 to clean or lubricate my AR-15?
No. WD-40 is a water displacer, not a gun lubricant. It may clean surface gunk in a pinch, but it leaves behind a film that can attract dirt and cause malfunctions. Stick with products made for firearms.
How do I know when my gas rings need replacing?
A quick test: extend the bolt and stand the BCG upright on a flat surface. If the bolt collapses under its own weight, the gas rings are likely worn out. It’s cheap and easy to replace them, so don’t wait until you have cycling issues.
What happens if I over-lubricate my rifle?
Too much oil can attract carbon, dust, and unburnt powder, turning your AR into a sludge magnet. That buildup can interfere with performance, especially in sandy or dusty environments. Stick to a “light film” approach on most parts.
Do I need to clean my AR-15 if I didn’t fire it?
If it was just sitting in the safe, probably not, but give it a quick inspection. Wipe down any exposed metal to prevent corrosion, especially if you live in a humid area.
Can I use a bore snake instead of a cleaning rod?
Yes. Bore snakes are great for quick cleans, especially at the range. But for deep cleaning, a proper rod, jag, and patch combo does a more thorough job of scrubbing the bore and removing fouling.
Is it okay to dry fire my AR-15 after cleaning?
Yes, dry firing a standard AR-15 won’t harm the gun. In fact, it’s recommended to function test it after cleaning to make sure everything was reassembled correctly.
How do I store my AR-15 after cleaning?
Store it in a cool, dry place with a light coat of oil on all exposed metal. Use a chamber flag for safety and consider a dehumidifier in your gun safe to prevent rust.


Justin Trump is the managing editor and owner of CAT Outdoors. The son of a Vietnam veteran, he’s a Certified Glock Armorer, an avid gun enthusiast and 2A advocate. He holds two firearm patents for the CAT M4 and Talon tools. When not managing CAT Outdoors, he enjoys spending time with his family and friends, rooting for Michigan sports teams, and serving his church.